Wednesday, October 19, 2011

Bacon Mac 'n Cheese

Another beautiful sunny 80 degree day in Ventura California!  I've been struggling with this weather and wanting to cook comfort foods since it is after all October and I should be wearing sweatshirts and making stocks for winter soups, but instead I'm running around in flip-flops and shorts and cooking on the grill.  Don't get me wrong I absolutely love the weather here, but I find myself missing the season changes, especially this time of year.  Despite the heat and sun I decided to make Bacon Mac'n Cheese, which I'm pretty sure goes over well ANY time of year...for most people!  I recently made a Mac'n cheese recipe from The Pioneer Woman and it was fabulous!  I tweaked it a bit by adding Smoked Gouda for half of the Cheddar and some Apple Smoked Bacon...there are no words for how good it turned out!

One of the most important tips for successful cooking is to have your mise en place...meaning everything in place.  I always measure everything out and put in bowls so that once I begin I don't get stuck trying to measure out ingredients while something on the stove starts to burn...too late!  I've done this too many times! And, don't get hung up on the thought that you don't want to wash so many dishes...it's just part of cooking and that's what dishwashers are for...all those bowls of ingredients will really save you in the end.


Now that mise en place is in order we can start the cooking.  Roast the Apple Smoked Bacon in a 400 degree oven by lining a sheet pan with a cooling rack and lay bacon slices out on the rack. 
This takes about 20 minutes depending on the thickness of the bacon.  I like my bacon a little on the crispy side, especially in this recipe because it tends to soften a bit while baking in the M&C.  Let bacon cool for five minutes, remove from rack and chop into small pieces. Set aside.


Start a large pot of water add salt and boil macaroni until cooked al dente.  Drain and set aside. 
In a large Dutch Oven or large pot, over med-low heat make a roux by melting butter and sprinkling in the flour.  Cook stirring constantly for 2-3 minutes.  Pour in warmed milk and mustard and whisk until a smooth, thick consistency is formed.  It is a good thickness when it heavily coats the back of a wooden spoon, about 5-8 minutes.
Take about 1/3 cup of the sauce and slowly whisk into the beaten egg, pouring in a slow steady stream.  This is called tempering.  You want to bring the temperature of the eggs up to the temp of the sauce without scrambling the eggs...that's why it's a slow and steady pour with constant whisking.  Once blended, pour egg into the pot with the sauce in it whisking until it's smooth and blended.  Add the cheeses, salt & pepper and stir until melted.  Taste to see if you need to add more salt.  Stir in macaroni and mix until combined, then fold in bacon.  This can be served immediately for a creamy style.  I poured into a buttered casserole dish and topped with cheddar cheese and baked at 350 degrees for 20 minutes.  The longer you cook the more dried out it will become so don't cook too long.

Serve right away, and try not to eat the whole pan...must have discipline!  I would also consider a garlic bread crust baked on top instead of cheese.  If you decide to try it I recommend making garlic bread, cool, cut into pieces and mix in food processor with blade attachment, into a crumble.  Sprinkle on top and bake.  I really wanted to do it this way, but got started too late and didn't get the garlic bread going in time...bummer because I'm sure it would of been sooo fantastic!  If you try it let me know how it turns out!

Recipe

1 lb of dried macaroni  ( I used rigatoni)
1 egg, beaten in a small-medium sized bowl
4 Tablespoons of butter
1/4 cup of all purpose flour
2 1/2 cups of whole milk
2-3 teaspoons of dry mustard ( I used 3 tspns and Colman's brand)
1/2 lb sharp cheddar
1/2 lb smoked gouda ( I used Trader Joe's and I removed the rind because it can burn)
Extra cheddar to top
1/2 teaspoon salt...may need more!
1/2 teaspoon pepper
3/4lb of bacon ( I used Trader Joe's Apple Smoked, uncured bacon)

Cooking
Preheat oven to 400 degrees F.

Take out sheet pan and place rack in pan.  Lay bacon out across rack, and roast bacon for 20 minutes.  Remove bacon, cool and chop.

Reduce oven to 350 degrees F.

Cook macaroni...or pasta of your choice until al dente...slightly firm.  Drain and set aside.
beat egg in bowl.  Warm milk in small pot over low heat.  In large pot over med-low heat melt butter and sprinkle in flour, whisk constantly 2-3 minutes.  Pour in warmed milk and dry mustard, whisk until smooth. This takes about 5-8 minutes. Once thick enough to coat back of a wooden spoon, reduce to low heat.
Take 1/3 cup of the sauce and slowly whisk, constantly into the bowl with beaten egg until well blended.  Pour egg mixture into pot of sauce whisking constantly until smooth.  Add cheeses, salt & pepper, stir until melted.  Taste and add more salt and pepper if needed.  Add bacon and fold in.

Serve immediately for a creamy texture or pour into a buttered casserole dish and top with cheddar cheese and bake until golden on top, about 20 minutes.

Thursday, October 13, 2011

Westlake Culinary Institute Graduation Banquet

                   
                                       Savor the Harvest


The graduation of my culinary school has finally come and gone, but it was no small feat! I had the honor of being elected Co-Executive Chef for my graduation banquet project.  It was a huge undertaking...to say the least!!  I felt very prepared for the cooking part, but not so much for the Exec Chef part. We were told to plan a banquet and set on our way!  So we hit the ground running with no time to look back.We organized comittees with leads, booked the location, and began to plan the menu...not easy to do with 17 different opinions!  After much compomise and several weeks of testing and tasting meetings we came to terms with an excellent menu that we were all proud of!  After that was in order we designed tickets and sold them, created our program, came up with all decor, put together a video...which one of my fellow student's husband voluteered to do and it came out amazing!  Find food vendors and farmers and aquire donations of food and wine, all that and more in just two months!! This is just a small list of the many things there are to do when planning such an event.  The highlight was the cooking, and it all came together so beautifully!  We all felt a great sense of accomplishment when it was all done at the end of the night!

We made six tray passed hors d'oeuvres, and a five course dinner.  Here's a look at some items from our menu.

One of our passed hor d'oeuvres were these Bouchees of Carmelized Onion, Brie & Candied Pecan. 
There are so many steps that went into these.  The puff pastry was made two days in advance, and then cut into shells and baked the day before.  The candied pecans were made two days in advance and the carmelized onions the day before as well.  The day of we filled the shells with onions, cut the Brie cheese and placed over onions, then the pecan on top and back in the oven to heat, then served. Oh and we made 200 of these!  So much time management in all of the cooking! 

This is a tangent of two Roasted Butternut Squash soups served side-by-side in one bowl.

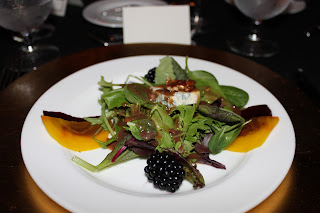
Field Greens with Roasted Beets, Spiced Pecans, Bleu d'Auvergne drizzled with a Blackberry Vinaigrette.


Seared Shrimp & Scallop over a Spinach Ricotta Ravioli in a Roasted Heriloom Tomato, Garlic, and Cream Sauce


Braised Boneless Short Rib in Red Wine Reduction, Filet Mignon & Bernaise Sauce, Roasted Root Vegetables & Scalloped Potatoes

Here is one of the centerpieces that set the mood for our fall,
"Savor the Harvest" theme.  These are real branches that were cut from local trees, and all the leaves and flowers were individually applied by hand...very time consuming. 

Just to give you an idea of the stress this event caused, these centerpieces were put together on location, the day of the event and required about six or more people and took about 5 hours, while simultaniously the rest of the students were in the kitchen prepping and cooking the food.   Me...I was running back and fourth making sure the kitchen was running smoothly and that everyone was doing their job on time, and then to the front to make sure the dining room was decorated properly, and that all decor would be pulled together and placed by our start time...sigh!  There were some tears during all this preparation, but I'm happy to report they were not mine!


This is "Chef" Tim McGrath with the Grand Puba hat we got for him as a gift!  It was an ongoing joke during our classes because he'd mentioned wanting one...and so he got one... and I think it's very fitting!
The Westlake Culinary Institute has been an amazing experience!  I've learned so many different techniques and cooking styles, and I now have so much more confidence in the kitchen!  I didn't realize how little I knew until I started this cooking venture...I thought I was a good cook...now I know I am!

Monday, July 18, 2011

Smokin in the Kitchen!

During the last couple of weeks at my culinary school I've been hearing my fellow students talk about these stovetop smokers that several of them have purchased.  They're talking about the shrimp, and salmon they have been smoking in these smokers, which are sold at the cooking store attached to my culinary school...which makes culinary school that much more expensive!  So I thought I would get one for my husband, and maybe that would justify the spending??

When I got home I showed it to my husband, and he was excited to use it and ran right to the market and picked up some spareribs.  We decided we would experiment with two recipes and make half of the ribs in the smoker and the other half we would boil, and then grill.  So we got them both cooking, the smoker takes a bit more time so we started that first.  Smoke started to creep out from the sides as it heated up, and I realized my entire house would smell of smoke!   I was not pleased that my house now wreaked of a hickory smoke smell and started to think this was a bad idea and were not doing this again! 

After an hour and a half the smoked ribs were ready to be grilled with BBQ sauce to finish them.  We opened the smoker and realized they were over cooked...bummer!  My husband decided, knowing they were over cooked, to grill them anyway with sauce for 10 minutes to see  how they'd taste.  He cut off the end pieces so we ended up with 1-2 ribs for each of the 4 of us (us & kids). 

We were all blown away with flavor of the smoked ribs, and even though over done, how much more tender they came out from the other ribs that were boiled.  At that moment we decided we would redo the smoked ribs again the next evening!  I know, I said I would never use that smoker in my house again, but they were so close to being so good, and we knew they would be amazing if we didn't over cook them!! 

So here's how we did em...

This time we bought babyback, or back ribs instead of spareribs...good change!


This is what the stovetop smoker looks like.  It also comes with a lid, but it didn't fit over the top of the ribs so we used foil instead.  The brand is Camerons Products, Stovetop Smoker!


First we took out the liner and the rack and added hickory smoke chips in the bottom of the pan, about 3 tablespoons full.  Then we placed the liner and rack back in the pan, and got the ribs ready.


We seasoned the three pounds of ribs with salt, pepper, and garlic powder.  Then placed the ribs on the rack and loosely covered with foil and turned on the flame to medium.  Once the smoke started to come up  we tightly closed the foil and started the timing.

We cooked them for an hour and a half in the smoker. We did them for 45 minutes less time then the guide suggested.  

 At this point you could refrigerate the ribs until the next day, I especially recommend this if you're making them for company and you don't want your house to smell like smoke...it may still be lingering a bit, but not too much!  Since these were just for us and we were anxious to see how they came out, we put them right on the grill!  We grilled the ribs with barbecue sauce (we used Famous Daves Rich and Sassy sauce) for 15 minutes.  

They turned out absolutely amazing!  The ribs slid right off the bone!  I highly recommend the smoking technique.  These are almost the best ribs I've ever had...second to Hill's Resort in Priest Lake Idaho, where they are smoked an entire day!   So happy I got that smoker after all, and next, I'm trying the shrimp!   

Tuesday, June 28, 2011

Banana Bread Pudding by Michael Voltaggio

 Last week I was flipping through the Williams-Sonoma catalog, as I love to do, and came across a recipe for banana bread pudding by Chef Michael Voltaggio (winner of Top Chef, season six).   So I decided I would give it a try!

On a side-note...

 A few weeks ago I volunteered at an event in L.A., Taste Of The Nation - No Kid Hungry, to raise funds for the organization.  I was lucky enough to meet Michael Voltaggio while helping out the chefs in the VIP area of the event. I didn't get to work hands-on as much as I'd hoped when signing up for the gig, but did get to do a little work alongside his new restaurant manager!  I was just happy to be able to hang out with well respected chefs from the L.A. area!  Michael will be opening his restaurant "Ink" sometime this summer in the Los Angeles area.
Here is Michael Voltaggio making Olive Oil ice cream using some dry ice in the mixer! 

Now back to the banana bread pudding! I wanted to serve it warm with ice cream for dessert, so it took some planning and organizing to make because there are several steps in making this!  

I first dried some crustless bread that I cut into 3/4" cubes by toasting in the oven for 15 minutes.


As the bread cooled I roasted the bananas in the skins until blackened and juices were oozing out!


I put the bananas flesh and juices from the pan in a blender and blended to a puree.  That was mixed into a cream, sugar and egg mixture and poured over the dried bread cubes and some hand broken Nilla wafers.  That rested for an hour, with a stir here and there.


Next this mixture was poured in to a 8" square pan and placed in  9x13 water bath, covered and baked for 45 min.  Uncovered and baked at a higher heat for 25 more minutes.


                   I cooled the bread pudding for about 10-15 minutes and served with vanilla ice cream!


Below is a link to the recipe! 

Wednesday, June 8, 2011

Paella...Culinary Style!

It was about five or six years ago that I purchased a paella pan from William Sonoma.  I also, bought the rice, and some sangria mix, thought I'd have a great "Paella Party"!  Well,  I ended up throwing out the rice and even the sangria mix because they eventually went bad as the idea of that party lingered on my mind here and there, but it never happened.  Every once in awhile I think...this will be the year I try to make the paella!  I still had the pan so, maybe?

Today would end up being the day!  I was at culinary school,  and today's recipe's theme were shellfish!  Each Wednesday at class we have several recipes and the chef will divide our students into three groups and divie up those recipes.  To my surprise my group got the paella recipe...alas I will make paella!


My two co-cooks and I begin the chopping and getting all the ingredients in order.  Mise en place, which basically means everything in place, and it refers to the prepping and organizing of all ingredients.  Yes, it might mean more little bowls to wash, but will end up saving you time and helping you have a smooth   cooking experience.  We began the cooking phase it a little before we had our mise en place and kinda panicked under the high heat, with half the ingredients already cooked and the other half not even prepped..aagh!  Bad communication on our part, but with three of us we quickly pulled the rest of the ingredients together just in time to not screw up the entire paella...which we were cooking two at a time!  All-in-all the recipe took about 1 1/2 hours to complete and it was so worth it because it was amazing!!  We got incredible feedback from the other students, a few even said it was the best paella they'd ever had!   


Thanks to Chef Tim for a great recipe!
Final presentaion!

Tuesday, June 7, 2011

Strawberry Jam

     It all started on Saturday at The Strawberry Jam at Terry's Berries in Ventura.  They have this sale one day a year, it's a $1 per pound of berries, and they're already hulled!   As I waited in line I chit-chatted with the people around me and listened to a million ways on how to make jam.  I stepped up to purchase my berries, (which I had no idea what I was going to do with yet) handed them my containers and they asked me how much I wanted...hmmm??   Not exactly sure why, but I bought twenty pounds, I mean how could you not at a dollar a pound, right?  At this point I decided that I too would make jam!  When I got home I called my girlfriend and we made plans to start our jam the next morning. 


     Sunday morning at 9:30 girlfriend shows up.  We had no experience, no canner, and no recipe picked out so we were just going to wing it!  Having never made jam before we each googled several recipes ahead of time, but decided to use one that came with the pectin we bought.  We had 24 jars, 3 boxes of SureJell pectin, and strawberries. 


First we had to wash and sterilize the jars and lids.  We washed, crushed, and measured out our strawberries and dumped them into an 8qt. pot.  Next, we stirred in the pectin and a little butter.  The heat went on, we boiled, added the sugar, and boiled again.  The wonderful sticky sweet concoction was ready for jars...a little hot, and a little messy!  Once placed in jars with lids fastened tight we put them in boiling water for ten minutes.  Afterward, set them in the pantry for 24 hrs to set.  That was it they were ready to be given to friends & family!